
Looking for a Madhubani painting easy enough for kids to try at home or in the classroom? Madhubani painting is a wonderful way for children to explore traditional Indian art through simple shapes, patterns, and colors.
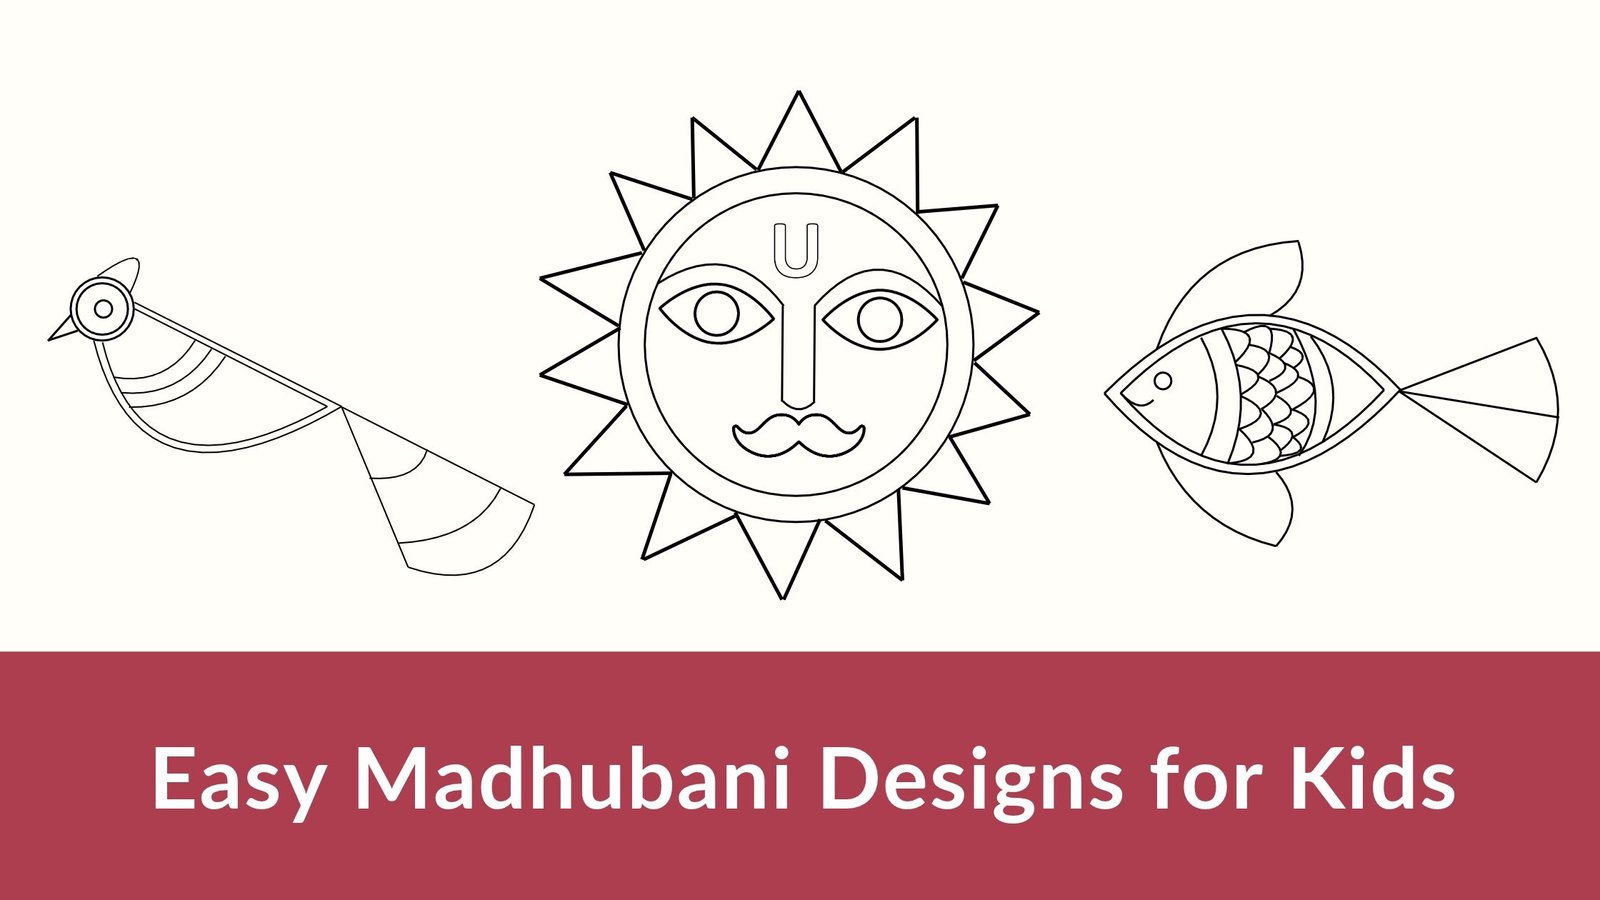
In this tutorial, we’ll show you how to draw three easy Madhubani designs step by step: a fish, a sun, and a bird. These designs use basic shapes and simple patterns, making them suitable for children in Classes 1 to 5.
- Fish: A simple design for younger kids who are just starting.
- Sun: A fun design that introduces facial features and decorative patterns.
- Bird: A slightly more detailed design for kids ready to experiment with patterns and colors.
All you need is paper, a pencil, a black sketch pen, and your favorite colors. Let’s get started!
What Makes a Painting Madhubani?
Madhubani painting, also known as Mithila painting, is a traditional art form that originated in the Mithila region of Bihar, India, and parts of neighboring Nepal.
Here are a few features commonly seen in Madhubani art:
- Nature-inspired motifs: Fish, birds, flowers, peacocks, and the sun are popular subjects.
- Bold outlines: Dark outlines help define shapes and bring the designs to life.
- Decorative patterns: Lines, dots, curves, and geometric shapes add detail to the artwork.
- Bright colors: Red, yellow, green, blue, and other vibrant shades are often used to fill the designs.
These features make Madhubani art for kids a fun way to explore patterns, practice drawing, and experiment with colors.
Materials You’ll Need
Gather these simple supplies before you begin:
- A4-size paper or a drawing sheet
- Pencil and eraser
- Black sketch pen or marker
- Crayons, colored pencils, sketch pens, or poster colors
- A ruler or a round object to trace circles, if needed
You don’t need expensive art supplies. A few basic materials are enough to get started.
1. Easy Madhubani Fish Painting for Kids
A fish is a great design for beginners because its body can be created using a simple oval. You can then add a tail, fins, and decorative patterns to give it a Madhubani-inspired look.
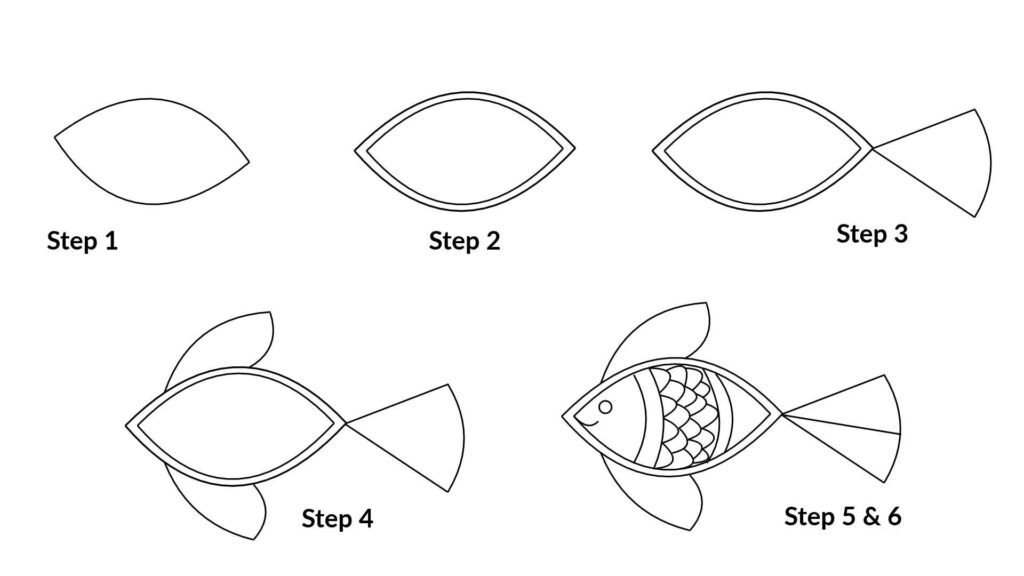
- Draw the body. Make a long oval in the middle of the paper, with pointed ends.
- Add a double outline. Draw another oval inside the first one to create a double outline.
- Add the tail. At one end, draw two lines to form a triangular shape. Join their ends with a curved line.
- Add fins. Draw a small triangular fin above the body and another below it.
- Draw the eye and mouth. Near the opposite end, draw a circle for the eye. Add a small curved line for the mouth.
- Fill the body with scales and patterns. Draw rows of small U-shaped curves, like tiny rainbows, until the body looks patterned. Add a few curved lines to the body and tail.
- Trace and finish. Go over the final lines with a black sketch pen.
- Add colors and patterns like lines and dots the way you like.
You can use bright, contrasting colors to make the scales and fins stand out. You can also practice the design with just a pencil before adding color.
2. Easy Madhubani Sun Drawing for Kids
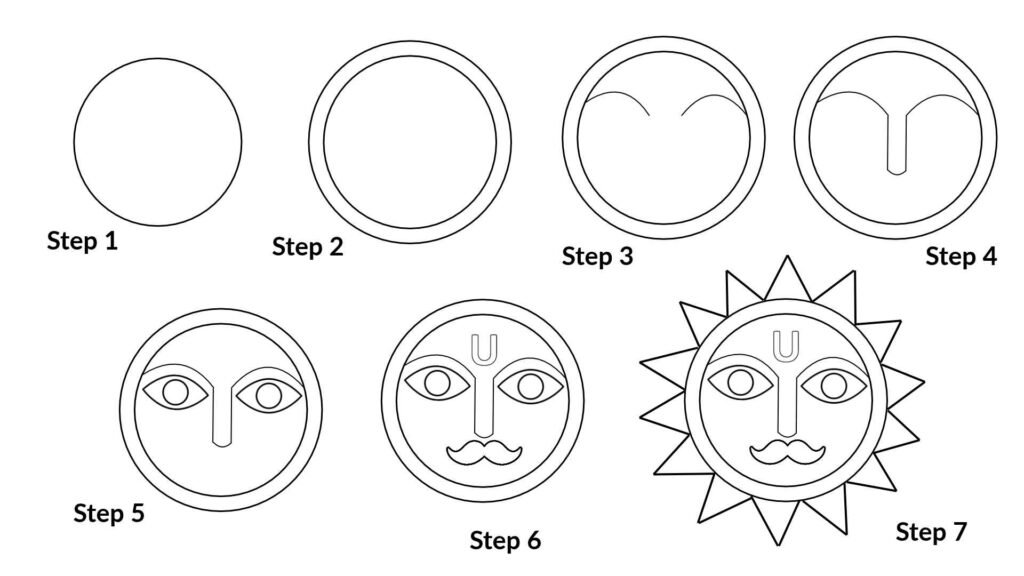
The sun is another fun Madhubani painting for beginners. Its circular face, expressive features, and decorative rays make it a great activity for kids who enjoy drawing and coloring.
- Draw a large circle. Place it in the center of your paper. Use a round object to trace the circle if you need help.
- Add a second circle. Draw a smaller circle inside the first, leaving a narrow ring between them.
- Add eyebrows. Inside the smaller circle, draw two curved lines that come toward the center, leaving a gap between them.
- Make a nose. From the tips of the eyebrows, draw two parallel lines and join them at the bottom with a curved line.
- Add eyes. Below the eyebrows, draw two oval eyes with a small circle inside each one.
- Add a mustache and a tilak. Draw a mustache below the nose. On the forehead, between the eyebrows, create a blank U shape for the tilak.
- Draw the sun’s rays. Add triangles around the outer circle. Keep them roughly the same size.
- Outline the design. Trace the circles, rays, and facial features with a black pen.
- Decorate the rays. Fill alternate rays with dots, stripes, tiny curves, or short parallel lines.
- Add color. Use yellow for the center and experiment with orange, red, and other bright colors for the rays.
Kids in classes 3 to 5 can experiment with different color combinations and patterns to make each sun design unique.
3. Easy Madhubani Bird Painting for Kids
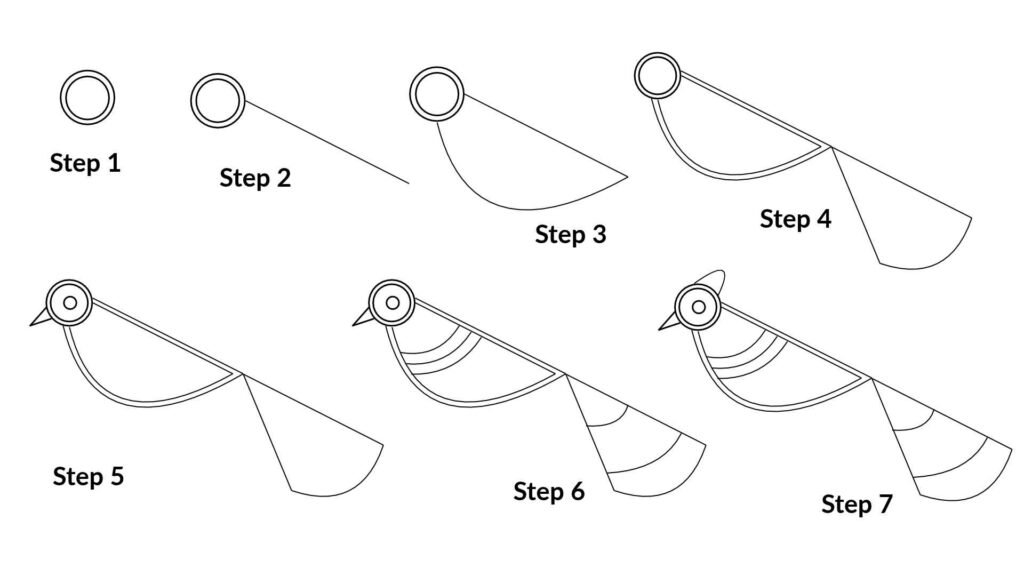
A bird is a lovely subject for exploring Madhubani art. Its body, tail, and crown offer plenty of space to practice decorative patterns and experiment with colors.
- Draw a large circle and a small circle inside.
- Add a line. From the circle, draw a long, slanted line.
- Create the body. Draw a curved line from the other side of the circle to the end of the slanted line to create the bird’s body.
- Add the outline and tail. Draw a second line inside the body to create a double outline. Draw two lines from the end of the body to form a triangle, then close it with a curved line.
- Add an eye and beak. Draw a circle for the eye and a triangle for the beak.
- Add patterns. Draw lines inside the body and tail to create decorative patterns.
- Add a crown. Draw a wavy crown above the bird’s head.
- Fill the empty spaces. Add small flowers, leaves, dots, or short lines around the bird and inside the tail.
- Outline and color. Trace the drawing in black. Color the body and neck in one shade, and use different colors for the feathers and their patterns.
Encourage kids to try different patterns and color combinations to make their artwork their own.
Easy Madhubani Border Designs for Kids
Decorative borders are often used in Madhubani paintings to frame the artwork and add detail. Kids can practice these patterns on their own or use them to decorate their fish, sun, and bird drawings.
Here are five simple Madhubani border ideas to try:
- Zigzag border: Draw a continuous row of connected triangles.
- Dot border: Make a line of evenly spaced dots along the edge of the paper.
- Leaf border: Draw small leaves connected by a curved line.
- Wave border: Create a repeating pattern of curved lines.
- Triangle border: Draw a row of small triangles and decorate each one with dots or lines.
These simple patterns are a good starting point for children learning how to draw Madhubani art. Check out our Madhubani border design practice sheets to explore the borders through various shapes.
Tips for Parents and Teachers
Introducing children to a traditional art form can be a fun learning experience. Here are a few ways to make the activity easier and more enjoyable:
- Start with basic shapes. Circles, ovals, and triangles help children build their designs step by step.
- Encourage practice. Let kids sketch their designs in pencil before tracing them in black.
- Focus on patterns. Repeating lines, dots, and curves help children become more comfortable with decorative details.
- Let them choose their colors. Encourage creativity rather than expecting every drawing to look the same.
- Keep it fun. The goal is to explore the art form and enjoy the process, not to create a perfect painting.
Madhubani painting can be a fun activity at home, in art class, or as part of a school project.
Explore More Madhubani Painting Design Sheets
Madhubani painting doesn’t have to be complicated. With a few basic shapes and repeating patterns, kids can create their own versions of traditional motifs.
Start with the fish or sun if you’re a beginner, or try the bird if you’re ready to explore more decorative details. Grab your pencils and colors, and enjoy creating your own Madhubani-inspired artwork!
Want to try more designs? Explore our Madhubani painting design sheets for additional patterns and drawing ideas.
Our printable resources can help kids practice traditional motifs, experiment with borders, and build confidence in their drawing skills at their own pace.
Frequently Asked Questions
1. Which colors are best for Madhubani painting?
Bright colors such as red, yellow, green, blue, and orange work well for Madhubani painting. Kids can use crayons, colored pencils, sketch pens, or poster colors, depending on their preferences and the paper they’re using.
2. Can kids make Madhubani art with a pencil?
Yes! Kids can draw Madhubani designs using just a pencil. They can practice outlines, patterns, and borders without adding color. A black sketch pen can be used to make the outlines stand out.
3. What paper is best for Madhubani painting?
A4-size drawing paper works well for simple designs and school activities. A thicker drawing sheet or art paper is a good option if kids plan to use poster colors.
4. Where did Madhubani painting originate?
Madhubani painting, also known as Mithila painting, originated in the Mithila region of Bihar, India, and parts of neighboring Nepal. It is known for its decorative patterns and motifs inspired by nature, stories, and cultural traditions.
5. What is the difference between Madhubani and Warli painting?
Madhubani painting often features bold outlines, decorative patterns, and motifs such as fish, flowers, birds, and the sun. Warli painting traditionally uses simple geometric shapes, including circles, triangles, and lines, to depict people, animals, and scenes from everyday life. Both are traditional Indian art forms, but they have distinct visual styles and cultural origins.