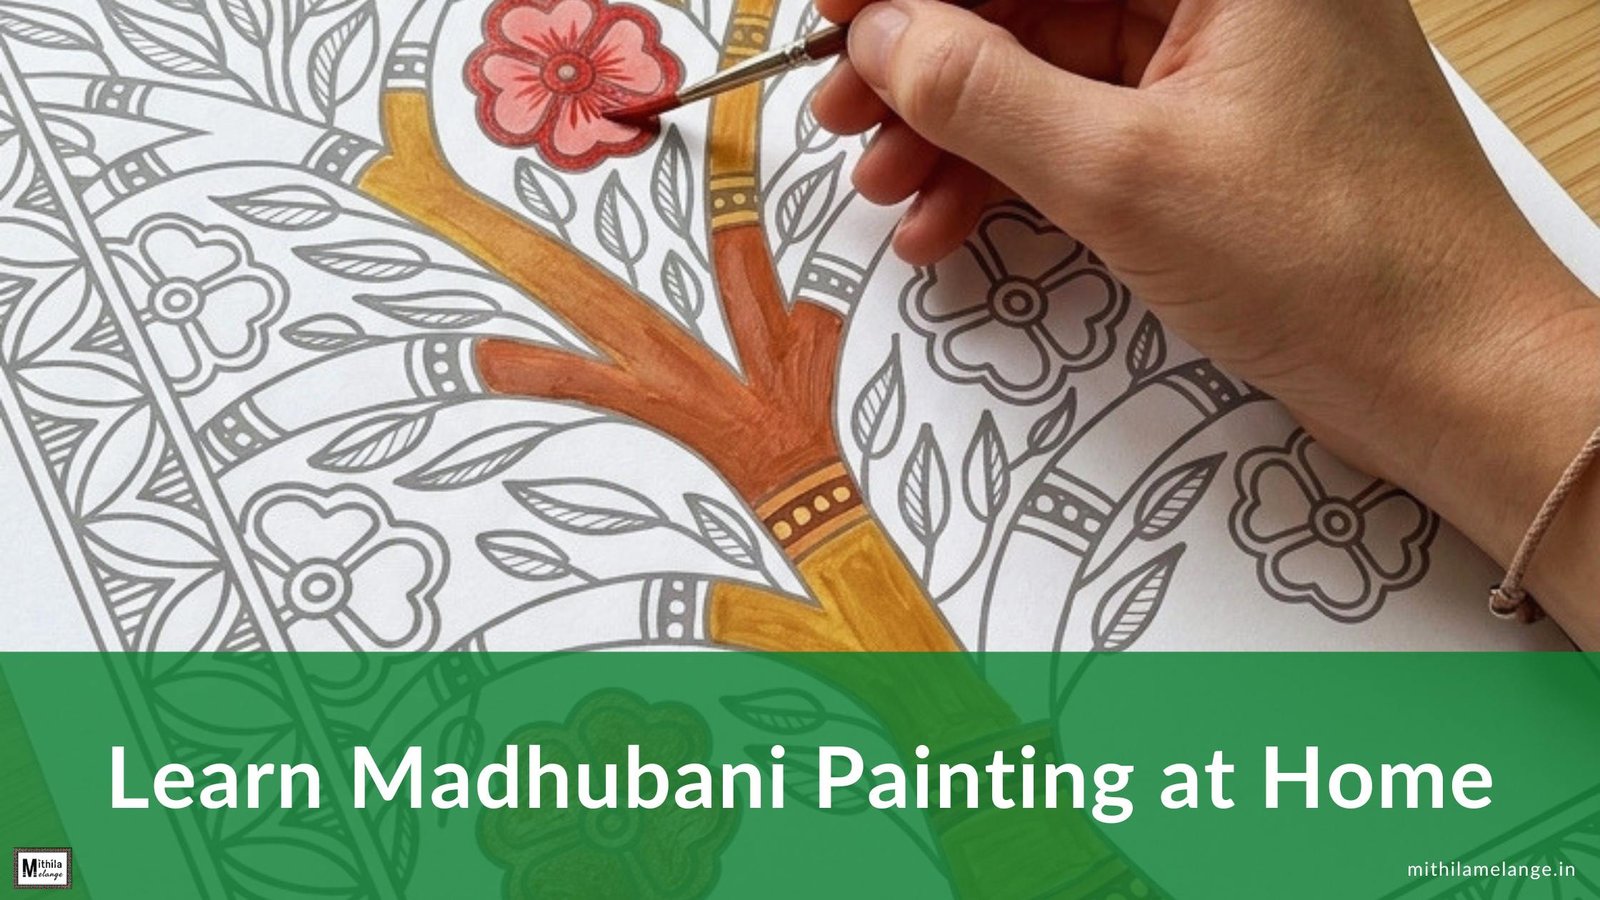
There’s something magical about Madhubani painting. The bold black outlines, the vivid geometric patterns, the motifs that seem to dance across the page. It looks like it belongs in a museum.
And yet, this centuries-old art form from the villages of Bihar was never meant for galleries. It was made on mud walls, by ordinary women, passed down through generations of mothers and daughters.
That’s exactly why it’s perfect for learning at home.
Whether you’re a complete beginner who has never held a paintbrush or someone looking to reconnect with Indian folk art traditions, this guide will walk you through everything you need to know to learn Madhubani painting.
Before diving into styles and motifs, let’s cover the madhubani painting basics: what makes this art form unique, why it’s beginner-friendly, and what you’ll need to get started.
What Is Madhubani Painting?
Madhubani (also called Mithila painting) is a style of folk art that originated in the Mithila region of Bihar, India, and in parts of Nepal. The name literally means “forest of honey” — madhu (honey) + vana (forest) — a poetic nod to the lush, mythologically rich landscape that inspired it.
For centuries, women painted these intricate designs on the freshly plastered walls and floors of their homes, especially during festivals, weddings, and religious rituals. The art depicted gods and goddesses, nature, and scenes from epics such as the Ramayana and the Mahabharata.
In the 1960s, during a severe drought in Bihar, the Indian government encouraged women to paint on paper and sell their work, and Madhubani art found its way into the wider world. Today, it holds a Geographical Indication (GI) tag, protecting its cultural authenticity.
What makes Madhubani paintings unique and immediately recognizable:
- Bold, confident outlines (traditionally made with twigs or fingers)
- No perspective or shading – everything is flat and symbolic
- Every space filled – empty space is considered inauspicious
- Natural motifs – fish, peacocks, lotus, sun, moon, elephants
- Vibrant colors derived originally from natural pigments
Why Learn Madhubani Painting at Home?
Madhubani painting is uniquely democratic. It was always a domestic art, created in homes by people with no formal training. You don’t need a degree in fine arts. You don’t need a studio.
Here’s why it’s an ideal art to pick up at home:
It’s deeply therapeutic. The repetitive filling of patterns, hatching, dotting, cross-hatching, is almost meditative. Many practitioners describe it as a form of moving meditation.
It rewards patience over talent. Madhubani is more about careful observation and steady hands than raw artistic genius. If you can draw a fish or a flower, you can do this.
It’s affordable to start. At a minimum, you need black ink/paint, a fine-tipped brush or pen, and paper. That’s it.
It connects you to something time-tested. In a world of digital noise, there’s something grounding about practicing an art form that’s over 2,500 years old.
The 5 Main Styles of Madhubani Painting
Madhubani isn’t one uniform style. It has distinct regional and family-based traditions. Here are the five you’ll encounter most:
1. Bharni (Filling Style)
The most vibrant and colorful style. Outlines are drawn first, then filled in solidly with bright colors. Best for beginners who love color.
2. Kachni (Line Style)
Minimalist and meditative. Forms are defined entirely through fine hatching and cross-hatching lines. No solid color fills. Black or red ink only. Requires patience but is enormously satisfying. Best for those who enjoy intricate linework.
3. Tantrik Style
Deeply spiritual imagery like yantras, chakras, and deities in cosmic forms. Heavy use of symbolic geometry. Less common but visually striking.
4. Godna (Tattoo Style)
Inspired by traditional tribal tattoos of the region. Black and white, with bold geometric patterns and body-art-inspired motifs. Very graphic and modern-looking.
5. Kohbar Style
Kohbar style of Madhubani painting is used specifically for wedding rituals, featuring bamboo groves, fish pairs (symbolizing fertility and love), lotus, and celestial beings. Rich in symbolism and typically very dense compositions.
As a beginner, start with Bharni (it’s forgiving and colorful) or Kachni (if you love fine-line work).
Tools & Materials You Need

One of the joys of Madhubani is that it has low material barriers. You can get started with easily found stationery at home. Here’s what you need:
Essential
- Paper: Ideally, thick cartridge paper (200 gsm or above) or handmade paper. Watercolor paper works beautifully. Canvas can be used too. Regular paper also works for beginners.
- Black ink or black poster color: For outlines. A waterproof black fineliner (0.1-0.5mm) is a modern favorite.
- Fine paintbrushes: Sizes 0, 1, and 2 for detail work; a size 4-6 for filling larger areas.
- Colors: Poster colors, acrylic paints, or fabric colors (if painting on cloth). Traditionally, natural pigments were used.
Optional but Helpful
- Pencil + eraser: For light sketching before inking
- Ruler or compass: For geometric borders
- A reference sheet or images of Madhubani motifs
Budget Alternatives
- Use a bamboo skewer or the sharpened end of a matchstick as a “pen” dipped in ink. The traditional way.
- Watercolor works perfectly as a cheaper alternative to specialized poster or acrylic colors.
Or skip the blank canvas. Our printable coloring sheets let you practice Madhubani patterns instantly.
Core Motifs & Patterns to Know
Before you start painting, spend some time studying the vocabulary of Madhubani imagery. These are the symbols you’ll use again and again:
- Fish (Maach): Fish is one of the most sacred motifs of Madhubani art. Represents fertility, prosperity, and good luck. Often found in pairs. Start your practice with fish. They’re simple and endlessly versatile.
- Lotus (Kamal): Symbol of purity and divine beauty. Appears as backgrounds, borders, and central elements. Great for practicing petal-filling techniques.
- Peacock (Mayur): Love, beauty, and the monsoon. The feathers are a perfect exercise in repetitive pattern-making.
- Sun and Moon (Surya and Chandrma): Always present together, representing the eternal cycle of time. Typically placed in corners or at the top of a composition.
- Elephant (Gaj): Strength, wisdom, royalty. Often depicted with decorative blankets and ornamental patterns.
- Border Patterns: Every Madhubani painting has a distinct border, often double or triple lines with fish, dots, floral chains, or geometric repeats. Learn 3-4 border patterns early; they frame everything.
- The Double-Line Outline Rule: In classical Madhubani, every major form is outlined twice — a thin inner line and a slightly thicker outer line. This creates that characteristic boldness. Practice this from day one.
✨ Not ready to start from scratch?
Download our free printable Madhubani designs and easy Madhubani coloring pages with pre-drawn motifs like fish, peacock, and lotus that you can fill in with color right away. Perfect for beginners, kids, and anyone who wants to practice before painting freehand.
Step-by-Step: Creating Your First Madhubani Painting
Let’s paint a classic beginner project: a fish with a decorative border.
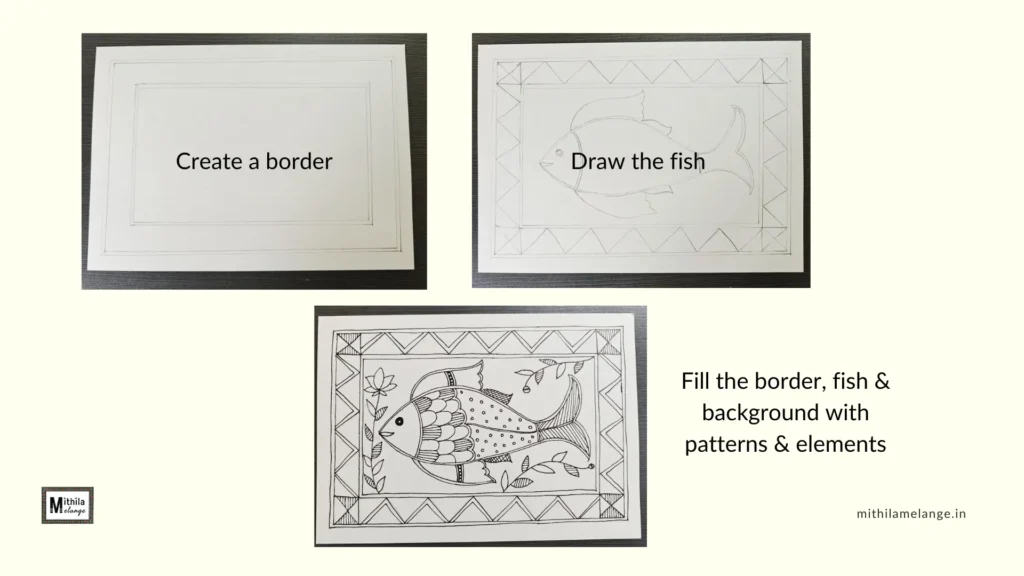
Step 1: Prepare Your Surface
Use A4 or A5 paper. Lightly pencil a border about 1.5cm from each edge. This will be your frame.
Step 2: Draw the Border
Using a fineliner or brush, draw a double-line border following your pencil guide. Fill the space between the lines with a simple pattern, such as circles, triangles, or hatching.
Step 3: Sketch Your Composition (Lightly in Pencil)
In the center, sketch a fish almost filling the area inside. Add scales and a few line decorations to the fish’s body. Around it, add leaves and lotus.
Step 4: Ink Your Outlines
Go over your pencil lines with black ink or a fineliner. Use the double-outline technique for the fish and lotus. Add fine hatching lines inside the fish body for texture (Kachni style), or leave them as open shapes for filling (Bharni style).
Step 5: Fill the Fish & Flowers
If doing Bharni style: fill the fish body and scale with solid colors (red, orange, or yellow are traditional). Fill lotus petals alternately with two colors. Fill leaves with solid green.
Step 6: Fill the Background
Fill any remaining white space with dots, tiny flowers, or geometric patterns. Remember: no empty space!
Step 7: Add Final Details
Go back with black ink and reinforce any outlines that look faint. Add dots/circles along the double-outline borders.
Total time for a beginner: 2-4 hours. Don’t rush it.
Here’s what it can look like:

Want to practice with the fish design?
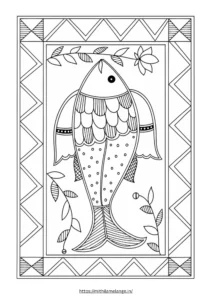
Download Free Madhubani Fish Coloring Page
Pro Tips to Level Up Your Madhubani Paintings
- Start with bigger shapes. When you’re learning, paint on A4 paper with forms that are at least 5cm across. Tiny, detailed work is harder to control as a beginner.
- Ink after pencil, not instead of it. Many beginners try to skip the pencil stage. Don’t. Even experienced Madhubani artists sketch lightly first.
- Your lines don’t need to be perfectly straight. Madhubani is a folk art. Slight wobbles and imperfections are part of its character and charm. Embrace them.
- Practice motifs in isolation first. Before doing a full composition, fill an entire page with just fish. Then a page of just lotus petals. Repetition is how this art form was traditionally learned.
- Study real pieces. Search for work by Madhubani art masters like Sita Devi, Ganga Devi, and Godavari Dutta. Notice how they use space, color, and line. You’ll absorb more from 20 minutes of careful observation than from 2 hours of aimless practice.
Color rules to follow:
- Use complementary colors in adjacent sections (orange fish on a blue background, for example).
- Leave some sections black-and-white to let the eye rest.
- Red, yellow, blue, green, black, and white are the traditional Madhubani palette. You don’t need 20 colors.
Common Madhubani painting mistakes beginners make (and how to avoid them):
- Starting too big. Your first piece should fit on an A5 sheet, not an A3. Smaller = more control, less overwhelm.
- Skipping the outline. Madhubani is an outline-first art. Never fill color before your black outline is complete and dry. Colors bleed into each other otherwise.
- Leaving empty space. In Madhubani tradition, empty space is considered inauspicious. Fill every gap with hatching, dots, or small patterns. This is also what gives Madhubani its characteristic dense, rich look.
- Using thin paper. Regular printer paper causes ink to bleed and curl. Start with at least 200gsm cartridge paper.
- Trying to be perfect. The charm of Madhubani is in its handmade imperfection. Slightly uneven lines and asymmetrical patterns are features, not flaws. Traditional artists never used rulers.
- Mixing too many colors early on. Start with 4-5 colors maximum. Traditional Madhubani uses bold, flat colors, not gradients or subtle shading. Keeping your palette limited actually makes your work look more authentic.
The Easiest Way to Start: Madhubani Coloring Sheets
Here’s an honest truth about learning Madhubani painting at home: the hardest part for most beginners isn’t the painting. It’s the drawing.
Getting the proportions of a peacock right, nailing the symmetry of a lotus, and figuring out how to compose a balanced layout. These are skills that take time to develop. And when you’re still figuring out how to hold a brush, struggling with the drawing simultaneously can be frustrating enough to make you give up.
That’s exactly why printable Madhubani coloring sheets are such a powerful learning tool.
Our Madhubani art coloring sheets come with:
- Authentic, illustrated outlines of classic motifs, including fish pairs, peacocks, lotus ponds, elephants, tree-of-life compositions, and more.
- Multiple complexity levels, from simple single-motif sheets for absolute beginners to intricate full-composition sheets for advanced learners.
- Instant download, print at home. No waiting, no shipping.
And the best part? You can print as many copies as you want and practice different colors and patterns in each.
Using coloring sheets lets you focus entirely on the color, technique, and meditative rhythm of Madhubani, while training your eye to recognize composition and pattern. After a few sessions filling in our pre-drawn outlines, you’ll naturally start to internalize the visual grammar of the art form.
Think of it the way musicians use sheet music: you don’t learn piano by composing original songs on day one. You learn by playing pieces that already exist, internalizing structure, until your hands know what to do. Coloring sheets are your sheet music for Madhubani.
Browse our Madhubani art coloring sheet collection →
✨ Love Madhubani Art?
Bring it into your home with our handcrafted Madhubani collection of coasters, magnets, trays, and more.
Madhubani Painting for Kids
Madhubani art is one of the best art activities for children. The bold outlines, simple shapes, and repetitive filling patterns are perfectly suited to young hands and short attention spans. Children as young as 6-7 can start with basic motifs like fish, suns, or flowers.
The best way to start with kids is with easy Madhubani coloring pages, with pre-drawn outlines they can fill in with their own colors, no drawing required. It builds confidence before they attempt freehand work, and introduces them to Indian folk art in a hands-on way.
Download our printable Madhubani coloring sheets →
Final Thoughts
Madhubani painting is one of those rare crafts where the process is as rewarding as the result. There’s something deeply satisfying about filling an empty space with pattern, color, and meaning.
You don’t need to be from Mithila to be part of that lineage. You don’t need special talent or expensive supplies. You just need a little patience, some ink, and the willingness to begin.
And if you want to begin in the easiest, most enjoyable way possible, start with one of our printable Madhubani coloring sheets. Let the outlines guide your hand while your creativity takes over the color. It’s the gentlest, most effective on-ramp into this magnificent art form.
Liked this guide? Share it with a friend who loves art, culture, or just needs a beautiful new hobby.
Frequently Asked Questions
Can beginners learn Madhubani painting at home?
Yes, Madhubani painting was always a domestic art, created in homes by women with no formal training. It rewards patience over talent. You don’t need a studio or art degree. Start with simple motifs like fish or lotus, use basic materials (paper, ink, poster colors), and follow the Bharni (filling) style, which is the most convenient for beginners.
Do I need any prior art experience to learn Madhubani painting at home?
Not at all. Madhubani art was traditionally taught to children in rural households with no formal training. If you can hold a pen, you can start.
What’s the best age to start learning Madhubani painting?
Any age. Children as young as 6-7 do beautifully with simple motifs (our coloring sheets are great for kids as well). Adults often find the repetitive patterns deeply relaxing.
What materials do I need for Madhubani painting?
You need thick cartridge paper (200gsm+) or handmade paper, black ink or a waterproof fineliner (0.1-0.5mm), fine paintbrushes (sizes 0-2 for detail, 4-6 for filling), and poster or acrylic colors. Optional but helpful: pencil, eraser, ruler, and a compass for borders.
How long does it take to learn Madhubani painting?
You can complete your first simple motif (a fish or lotus) in 1-2 hours. Basic competency with patterns and fills takes 2-4 weeks of regular practice. To develop a personal style and tackle complex compositions like Kohbar or Bharni, expect 3-6 months. Because it rewards patience over talent, most beginners see satisfying results within the first session.
How long does it take to get good at Madhubani painting?
With regular practice (even 30 minutes a week), most people feel confident with basic motifs within 4-6 weeks. Developing a personal style takes longer, but that’s the fun part.
Can I use regular watercolors or colored pencils?
Yes! While poster colors are traditional, watercolors give lovely, soft results. Colored pencils work well on coloring sheets and are great for beginners.
Is there a “wrong” way to do Madhubani art?
The only real rule is to fill your space and stay true to your intention. There are stylistic traditions, but Madhubani has always evolved. Be respectful of the tradition, and then make it your own.
What paper is best for a beginner?
To learn Madhubani painting at home, starting with thick cartridge paper (200 gsm) is the best. Avoid thin printer paper. Ink will bleed. However, it’s perfectly fine to use regular paper for practice. As you advance, try handmade paper or fabric.
What is the difference between Madhubani and Mithila painting?
They are the same art form, just named differently. “Mithila painting” refers to the geographic origin – the Mithila region of Bihar and Nepal. “Madhubani painting” is named after the Madhubani district, where it became most prominent. Both terms are used interchangeably, though “Mithila painting” is preferred when emphasizing the broader cultural tradition, and “Madhubani painting” is more common in commercial and international contexts.

